A Dual-Node Home NAS Cluster for $210
Over the past 20 years or so, I’ve accumulated about a terabyte of data that is important to me and my family. This data primarily consists of home videos taken with a Sony HD camcorder and a Nikon DSLR camera as well as pictures and videos taken from various smart phones over the last twelve years. This is personally valuable data that I want to protect, preserve, and have easy access to at home.
Traditionally, I have kept these files on a computer and used an external hard drive as backup. This got the job done, but left something to be desired. It was a chore to remember to periodically get the backup out, and copy recent data. Sometimes, I’d forget to do this for a whole year. And playing the videos on a TV was typically more trouble than one would hope—having to get an HDMI cable out, hooking up a laptop to the TV, and navigating through each video file from the laptop.
So I decided to do a fun home hobby project and make a custom DIY home NAS system to store and secure my terabyte of data and make it easily streamable to my TV. I’m happy to say that I’ve completed the first working production version of it. In this article, I will tell the full story of this home NAS and video streaming project and all the fun I had implementing it.
Note: this article mentions several technologies related to storage, cloud, and automation. If you’re not familiar with any of them, follow the links to learn more.
Project Goals
The first goal of the project was to make a reliable backup system—one you don’t have to worry about. While computer and hard drive failures are somewhat rare, they absolutely do happen and I’ve lost a number of devices over the years. Fortunately, with serviceable backups, I’ve never had any major data loss, but I have had to scrape recent non-backed up data off a dead computer with functioning storage before, and it was not fun. Cloud services can be great but they’re also limited by the bandwidth of your internet connection and will run upwards of $100 per year for a terabyte.
The second goal was ease of use both for backing up new content and for letting any family member stream home videos to our family room TV. Typically in the past this has been done by connecting a laptop (that either has the data internally or with an external hard drive) to the family room TV. That was never particularly difficult to do but perhaps one or two steps too many for it to be a common occurrence.
The third goal was affordability. I could easily drop $400 on a pre-built appliance and some hard disks, but, for this project, I wanted to use my skills to make my dollars go as far as possible. I also wanted a system that is easy to turn on and off, so that it’s not burning electricity and wasting money all the time. I really only need the system to be available a small percentage of the time.
The Design
I designed the system around the idea of using cheap second-hand computers running FreeBSD and ZFS and a system of automatic replication. Cheap second-hand computers are readily accessible on eBay. But you’re getting a machine that’s been powered on in an office for years, possibly a decade. There is simply no telling when such a machine will die. So, the plan was to set up two computers in a cluster—one serving as the primary and the other a replica. If either dies, a replacement can be ordered and set up in a matter of weeks. ZFS send/recv provides an easy and efficient way to replicate an entire file system from one host to another. In practice, I only plan to use a single primary and single replica, but the system is designed to support multiple replicas if desired in the future.
But what if they both die around the same time? It seems unlikely but perhaps more likely than one might expect, if, say, both machines were taken from the same office and have about the same amount of power-on time. I’ve never been one to roll the dice, so I planned on an additional replication step to the cloud. I use AWS extensively at work and know my way around S3 pretty well now. S3 Glacier Deep Archive is one of the most affordable cloud storage options available these days with the only disadvantage that you may have to wait up to 48 hours to have your data restored. Given that S3 is really the backup to the backup here, the 48 hour wait in an unlikely failure is fine. Glacier Deep Archive is a great fit. The overall design is shown in the following diagram.
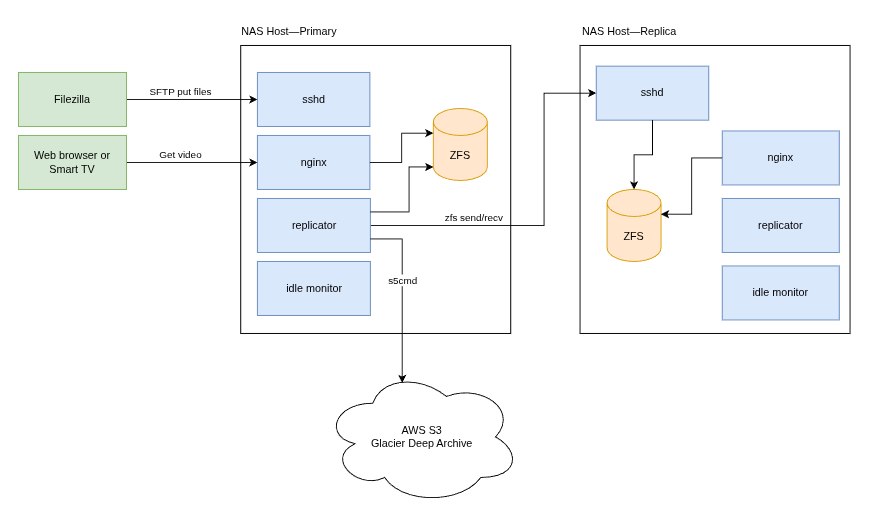
Custom software components were planned for setting up and maintaining the NAS hosts using Ansible, replicating a ZFS dataset, creating cloud resources, and monitoring the NAS hosts for inactivity. Each custom component is described in the following table.
| Custom Component | Description |
|---|---|
| Ansible provisioning playbook | Installs all needed software on the machine (packages and custom software), sets up ZFS datasets, directories, permissions, and cronjobs. |
| Ansible patching playbook | A simple playbook to apply the latest OS updates, installed packages to the latest version, and reboot the system, if necessary. |
| AWS CDK stack | Creates an S3 bucket with a lifecycle rule to move all files to the Glacier Deep Archive storage tier after a 2 day waiting period. Also creates a credential for the FreeBSD hosts to access S3 and stores it in the SSM parameter store. |
| Replicator | A Python program to invoke ZFS commands to create a new snapshot and run ZFS send/recv commands to send data to all replicas. Runs on a cronjob every 30 minutes. |
| Idle Monitor | A Python program to shut down the system after 30 minutes of inactivity (i.e. no recent SSH connections or nginx requests). Runs on a cronjob every 5 minutes. |
Several free or open source components are also integrated into the design for pushing files to the NAS cluster, serving content on the LAN, syncing the ZFS dataset to AWS S3, and waking up NAS hosts conveniently on demand. These components are listed in the following table.
| Free Component | Description |
|---|---|
| nginx | Serves video files on the LAN. Accessible from a smart TV with a web browser by referencing a local static IP address. |
| s5cmd | A high performance program for S3 work. Works around the fact that AWS CLI version 2 is not available in FreeBSD packages (version 1 is being sunsetted). |
| Wake Me Up | An iPhone app that emits wake-on-LAN packets. Used to wake the NAS system up conveniently from my phone. |
| FileZilla | GUI for moving files from a laptop/desktop computer to the NAS cluster. |
I do not currently have a local DNS solution, so the plan was to access the NAS hosts via a static IPv4 address. The idea was that any user on the local network could turn on the NAS system with the Wake Me Up app on their phone and simply open the static IP address on any device with a web browser, including a smart TV.
Finally, the local development environment was a Linux machine. All development including coding, building, and running unit tests had to be doable under Linux with integration testing doable with local VMs running FreeBSD, as I do not have a FreeBSD development machine available.
The Results
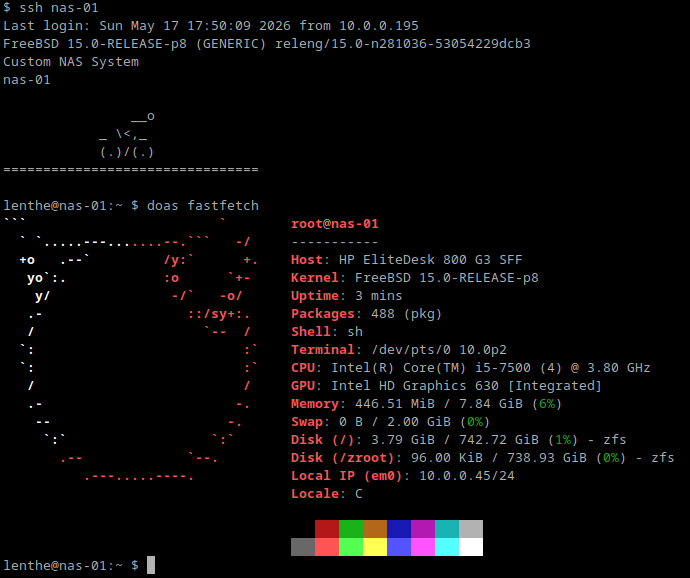
Inexpensive hardware that is compatible with FreeBSD was easy to find on eBay. I went with a pair of identical HP EliteDesk machines with Intel i5-7500 and 8 GiB of RAM. Each box was just $55 a pop. These are comfortably spec’d for my NAS purposes. The machines came in excellent condition for their age—just a few minor scratches on the outside. The insides had no dust whatsoever. The machines came with Intel I219-LM Ethernet chips which worked on FreeBSD with no trouble whatsoever.
The machines were sold with no hard disk, so I purchased those separately on eBay. I went with a pair of Seagate 2TB enterprise HDDs. These cost just $25 a pop. Installation of the drives in the EliteDesk machines was a breeze. The case opened easily and provided easy access to the hard drive bays. The 2TB drives give me plenty of space for my 1 TB of data plus the OS and software with some room yet to grow. There is also an additional HDD bay in each machine if I ever need an additional drive. I had to purchase a pack of shock absorbing hard drive mounting screws for $6.99, as mounting screws did not come with either the computers or the hard disks (and could not find any appropriate ones in the various boxes of my basement). In all, the hardware cost $209.87 when shipping and tax are included. The monthly cost for AWS S3 will be under $2 a month.
| Item | Qty | Unit Price | Subtotal |
|---|---|---|---|
| HP EliteDesk (i5-7500, 8 GiB RAM) | 2 | $55.00 | $110.00 |
| Seagate 2TB Enterprise HDD | 2 | $25.00 | $50.00 |
| Shock-absorbing HDD mounting screws (20 pieces) | 1 | $6.99 | $6.99 |
| Shipping & tax | — | — | $42.88 |
| Total | $209.87 |
Software development went better than expected. Ansible has fantastic
support for FreeBSD and I had no trouble getting playbooks set up to
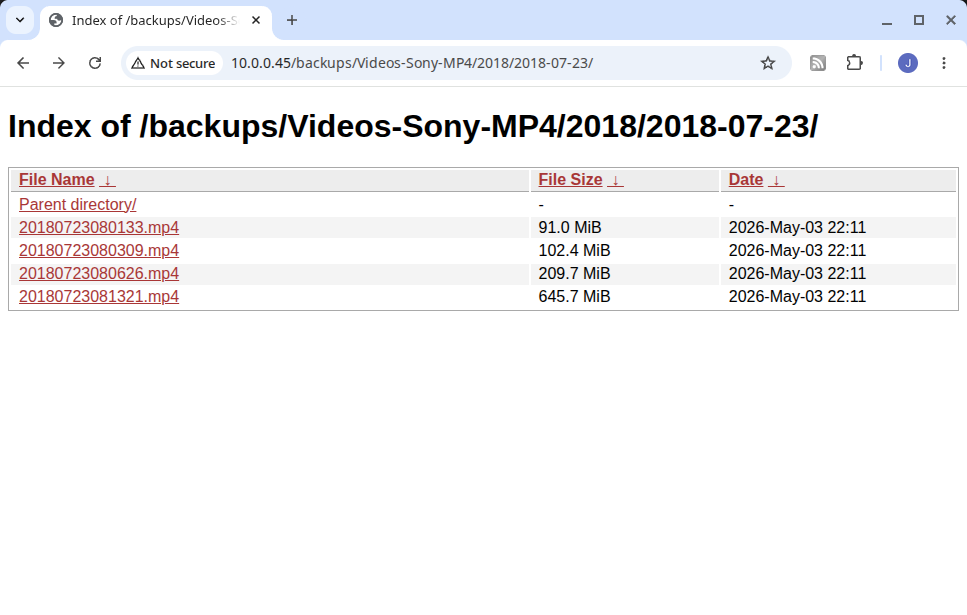
do all provisioning and patching. Nginx is also well supported and a
breeze to set up on FreeBSD. I installed the nginx-full package to get
the fancyindex module which provides a simple file system browsing
experience from my smart TV (or any local device with a web browser).
All in all, it’s a real treat to open
htop and see only 25 processes, each of
which I can readily understand. It reminds me of an earlier age when
computer systems were simple enough to understand in their entirety.
The replicator program is really the heart of the system. It starts by
checking the local NAS dataset according to configuration and checks
that all snapshots follow the established naming convention which
includes a sequence number to keep track of state between the primary
and replicas. Assuming everything is locally in good order, then a new
snapshot is created. Snapshot creation is very fast—a small
fraction of a second. Then it connects to each replica via SSH and
verifies the state of the replica’s snapshots. If everything is
in a good state, the replicator will attempt to replicate the dataset.
If this is the first snapshot, an initial snapshot is sent using ZFS
send and ZFS recv. If this is not the first snapshot, then an
incremental send/recv is performed from the common ancestor snapshot
up through the latest snapshot just created. All ZFS commands
originate from the primary which acts as the sole coordinator.
Commands for the replica, like zfs recv,
are executed from primary on the replica via SSH. Mutual SSH keys to
facilitate this communication are set up in the Ansible provisioning
playbook. After successful transfer of the latest snapshot, old
snapshots are cleaned up locally and on each replica. A configurable
number of the most recent snapshots are retained (currently 3). I have
so far seen that this works extremely well and is extremely fast for
transferring large amounts of data over the local network.
After all ZFS work is complete, the replicator runs
s5cmd to sync the ZFS dataset with the S3
bucket. Initially, I ran into a bit of trouble with
s5cmd in getting my full terabyte to the
cloud. s5cmd by default creates 256
workers to transmit as much data in parallel as possible. This turned
out to be too aggressive for my situation and most of my upload
bandwidth was consumed. So, I had to kill it and resume replication
overnight. This meant that partial progress on a number of large files
was lost. Fortunately, the solution to this problem was
simple—the --numworkers argument.
Using a limited number of 4 workers, I found that
s5cmd still used a significant amount of
my bandwidth (though not all) and files were able to complete
efficiently. It was just the simple case of over-parallelization of a
workload leading to work not getting done as quickly as possible. Once
I tuned the number of workers, I have had no issues with
s5cmd.
The logic of the idle monitor is fairly straightforward to implement—it simply scrapes SSH and nginx logs for recent activity and decides whether to stay up or shut down. But it turns out to be a tricky thing to test and debug. Testing involves doing an activity, such as making and closing an SSH connection, then waiting for the idle monitor to run, and checking that the host hasn’t been shut down. Log files indicate all the metrics that are collected at a point in time (e.g. time since last SSH connection) and provide the exact reason for not shutting the system down.
One nice bonus result was that I realized that this NAS system, using SSH as its primary access mechanism, is trivial to use as a local git server. I just needed to add installation of git to the provisioning playbook and, voilà, now I had backed-up git repositories on the local network accessible via SSH.
The AI Angle
I initially started development of this project using GitHub Copilot auto-completion as an aid and productivity booster. Part way through I switched to agentic-based development using Claude Code and spec-driven development. The idea of spec-driven development is that you work with an agentic AI tool to create a spec for a feature or update. In my case, the spec is comprised of three markdown files: requirements, design, and tasks. Once developed, these files become the prompt that AI uses to generate the code. I review all generated code before executing it and then review it a second time before merging to the main branch.
This turned out to provide a huge productivity boost. I was able to complete the replicator and idle monitor with ease and the rigor of full unit test coverage. I was also able to create a complete set of integration tests that create a pair of local VMs, run the Ansible provisioning playbook, and then a battery of replication tests including fail-over from the primary to the replica, and a battery of tests for the idle monitor.
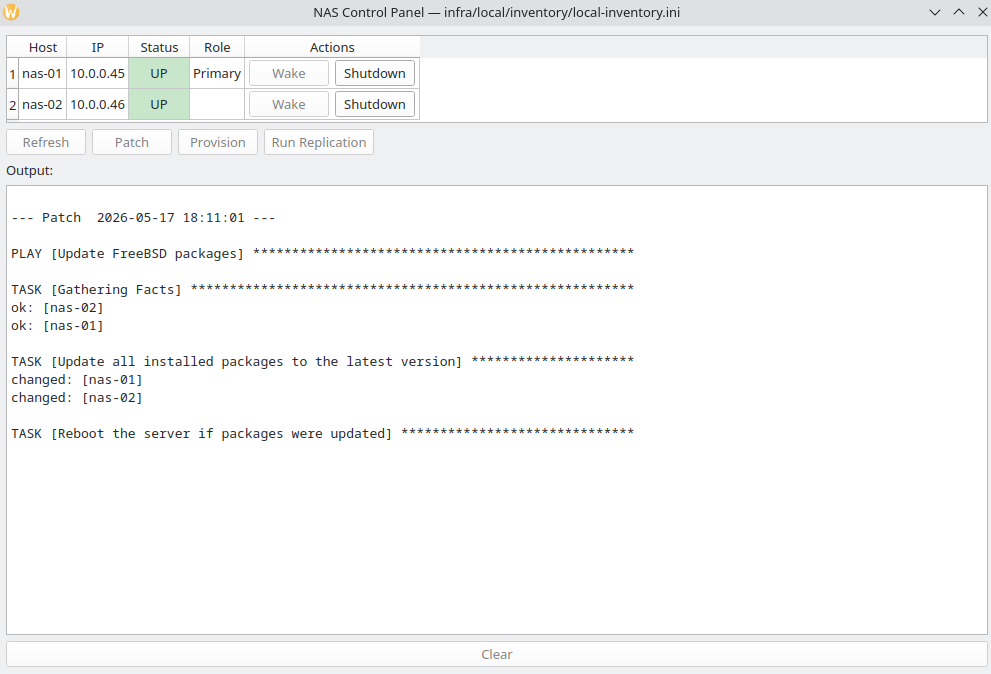
Perhaps the biggest boost of all is that I was able to create a “control panel” GUI for the NAS cluster. This provides an up/down status for each host in the cluster, actions to wake and shut down each host, and actions to patch the hosts, run the provisioning playbook, or run the replicator on demand—all with the click of a single button. This gives me full control of the NAS from my home office without having to touch the actual hardware off in a separate room (which I’d like to relocate to the basement in the future). The GUI is written in Python using PySide6.
Future Work and Conclusions
My custom home NAS and video streaming is version 1.0 complete and in production now and I’m very happy with its capabilities. The next large step that I may take is to create a better user interface to replace the nginx fancyindex module. This would likely come in the form of an SPA that allows videos in the same directory to be played in sequence automatically (without needing to individually click on each video) and other helpful features such as search.
Overall, I’m very satisfied with the choice of FreeBSD, ZFS, and cheap secondhand hardware from eBay. This makes for an excellent platform for data storage. ZFS is a dream of a file-system come true. Python, Ansible, and Nginx all work extremely well on FreeBSD. And most importantly, I feel much better about the safety of my valuable data.
Acknowledgements
Claude was used in the preparation of this article for light proofreading, stylistic suggestions, and formatting.